Installation Instructions :: The basic instructions on installing glass tiles involve making sure that the substrate is level and dry. Doing so will ensure that the glass tile will stay flat on the surface.
STEP # 1 : Wall Surface Preparation : Properly treat the surface onto which mosaic will be applied according
to your own situation.
The performance of a properly installed thin-set tile application is dependent upon the durability and dimensional stability of the substrate to which it is bonded.
STEP # 1 : Wall Surface Preparation : Properly treat the surface onto which mosaic will be applied according
to your own situation.
- Plaster : Make sure your new plaster wall is completed dried before setting while scratching the old plaster surface to provide enough “grip” to hold mosaic.
- Various kinds of Wallboards : Walls of this type must be firm, with no warping . "Dry wall" should be waterproofed if it is not already.
- Thick and Waterproof Plywood
- Smooth Concrete
- Tiled or others
The performance of a properly installed thin-set tile application is dependent upon the durability and dimensional stability of the substrate to which it is bonded.
TOOLS
|
Here , we also provide information on the tools required for Mosaic Tile Installation ; all of these are generally available locally or already with your tile installer :
|
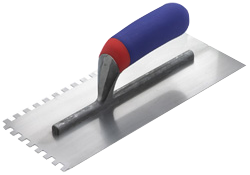
V Notched Trowel

Rubber Surfaced Trowel
|
STEP # 2: Setting materials application :
All materials should be used according to manufacturer's directions. Due to the transparent nature of glass, the color choice of the bonding material will impact the ultimate look of the tile. We recommend the use of White Bonding Adhesive adhere to manufacturer's recommended cure times for all setting materials. Pool, spa, and all submerged applications require a minimum of a 21-day cure time after grouting before the installation can be submerged or exposed to heavy water use.
Installing Crystal Amaze Glass Mosaic requires thin-set mortar mixed with a liquid latex admixture . Contact us for information on suitable adhesives for your surface and availability of the same , near to your place .
|
|
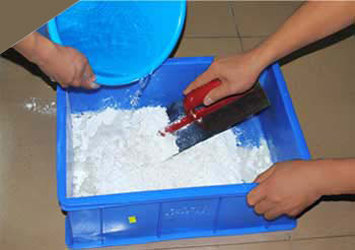
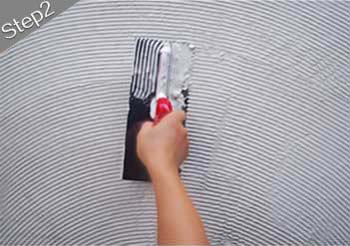
- Using the flat side of a (3/16” x 1/4” V-notch) trowel to initiate the bond coat, firmly apply the setting material into the substrate.
- With additional setting material, using a (3/16” x 1/4” V-Notch) trowel, comb horizontal, full notches in one direction to establish the proper depth of the setting bed.
- Using the flat side of the trowel, flatten the notches to achieve a smooth, consistent setting bed approximately 1/8” thick.
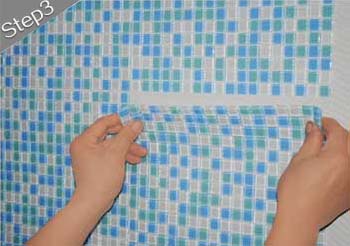
STEP # 3 : Sheet Application : Apply Crystal Amaze Glass Mosaics into the setting bed (backside with mesh) , using light even pressure to establish contact and eliminate any voids. To achieve a uniform, flat surface tap lightly using a wooden beating block and a hammer.
Apply each subsequent sheet so that grout joints line up and a consistent field is maintained. To unify tile surface from one sheet to the next use a wooden beating block and hammer, again tapping lightly from one sheet to the next. Prior to setting each sheet, check the setting bed for skinning (slight drying of the thin set surface.) If skinning occurs, remove setting bed and reapply.
Cure a minimum of 48 hours prior to cleaning. Using a nylon brush and water, scrub excess adhesive and glue from the tile, followed by wiping clean with a damp sponge. Allow to dry prior to grouting.
|
|
|
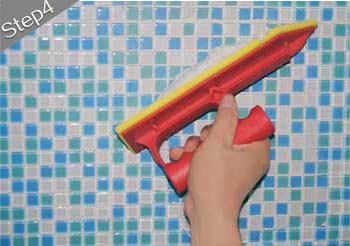
STEP # 4 : Grouting : Use only standard grade sanded grout mixed to manufacturer’s instructions. Apply grout with a rubber float, forcing grout into joints until full.
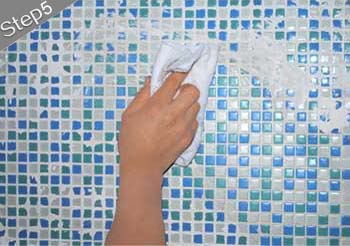
Grout joints shall be full and uniformly finished. Due to the impervious quality of glass, the grout will take longer to set than with more porous materials. For initial cleaning use clean, dry cheese cloth. This method wicks additional moisture from the grout and avoids washing out the grout joints. Allow grout to set up and smooth finish with a damp sponge. STEP # 5 : For final polishing of excess grout haze use a clean, soft cloth. |
|
Maintenance Information :
New Installations : Please do not attempt to clean new installations for a minimum of 24 hours after completing the grouting process. After 24 hours remove loose dirt by vacuuming or sweeping.
Follow directions and prepare a cleaning solution using warm water and a neutral ph cleaner specifically designed for cleaning Glass Mosaic Tile. These types of cleaners are available from tile suppliers. Thoroughly clean the Glass Mosaic Tile, including the grout joints, using a nylon scrub brush or nylon scrub pad following the manufacturer’s directions.
Rinse thoroughly with clean, warm water and allow to dry. A second rinsing may be needed to completely remove the cleaning solution.
Installations after grout has cured ten days and existing installations : Use the following method for installations with cement based grout or setting material haze that require a stronger cleaning solution. Wait 10 days after the grout has been installed then use a Sulfamic Acid cleaner such as C-Clean or Custom Clean. Follow the manufacturer’s directions using a nylon scrub brush or nylon scrub pad.
TIP: Try applying the solution and allowing it to soak in for 3-5 minutes followed by re-applying and scrubbing.
Rinse thoroughly with clean, warm water and allow to dry. A second rinsing may be needed to completely remove the cleaning solution.
Additional cleaning for latex based smears (optional) Stone and tile strippers. The stripper will work to clean latex smears not removed by using acid based cleaners. Allow a minimum of 10 days cure time and always follow the manufacturer’s directions. Rinse thoroughly with clean, warm water and allow to dry. A second rinsing may be needed to completely remove the cleaning solution.
Recommendations
Sealers are beneficial for grouts; however, they will not penetrate the tile due to the impervious nature of glass. Consult grout manufacturers for their recommendations.
TIP: To reduce the possibility of sealer smears, buff sealer off glass tile with dry, clean towels before it dries.
NOTICE: This information is offered as a guideline only. No warranty is implied. For best results, hire a professional tile installer experienced in the application of face-mounted glass mosaic tile.